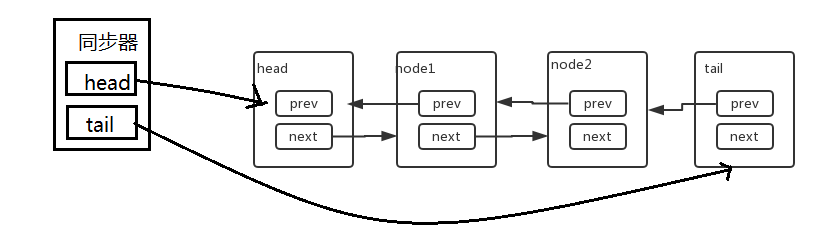
CLH队列
AQS内部维护着一个FIFO的队列,即CLH队列。AQS的同步机制就是依靠CLH队列实现的。CLH队列是FIFO的双端双向队列,实现公平锁。头节点是一个获取同步状态成功的节点。线程通过AQS获取锁失败,就会将线程封装成一个Node节点,插入队列尾。当有线程释放锁时,后唤醒头节点的next节点(第二个节点)尝试占用锁。
CLH队列结构
Node类
CLH队列由Node对象组成,Node是AQS中的内部类。
重要属性
1 | //用于标识共享锁 |
CLH队列源码执行顺序
- 线程调用acquire方法获取锁。tryAcquire返回true,获取锁成功。返回false,获取失败则会通过addWaiter方法追加到CLH队列队尾。
1
2
3
4
5
public final void acquire(int arg) {
if (!tryAcquire(arg) &&
acquireQueued(addWaiter(Node.EXCLUSIVE), arg))
selfInterrupt();
}
- addWaiter(Node.EXCLUSIVE)方法会将当前线程封装成Node节点,追加在队尾。
1
2
3
4
5
6
7
8
9
10
11
12
13
14
15
16
private Node addWaiter(Node mode) {
Node node = new Node(Thread.currentThread(), mode);
// 获取原队尾
Node pred = tail;
if (pred != null) {
node.prev = pred;
//用cas更新 ,pred是原来队尾,作为预期值,node作为新值
if (compareAndSetTail(pred, node)) {
pred.next = node;
return node;
}
}
//前面cas更新失败后,再enq方法中循环用cas更新直到成功
enq(node);
return node;
}
- acquireQueued方法中会使线程自旋阻塞,直到获取到锁。
队列中节点获取占用锁机会的条件
1、前驱节点是头节点
2、前驱节点的waitStatus=Node.SIGNAL1
2
3
4
5
6
7
8
9
10
11
12
13
14
15
16
17
18
19
20
21
22
23
24
25
26
27
28
29final boolean acquireQueued(final Node node, int arg) {
boolean failed = true;
try {
boolean interrupted = false;
for (;;) {
//1. 拿到当前节点的前驱节点
final Node p = node.predecessor();
//2. 如果当前节点的前驱节点是头节点的话,就再次尝试获取锁
if (p == head && tryAcquire(arg)) {
//成功获取锁后,将节点设置为头节点
setHead(node);
p.next = null; // help GC
failed = false;
return interrupted;
}
/**
更改当前节点前驱节点的waitStatus,只有前驱节点的waitStatus=Node.SIGNAL,当前节点才有可能被唤醒。如果前驱节点的waitStatus>0(即取消),则跳过取更前面的节点。
*/
if (shouldParkAfterFailedAcquire(p, node) &&
//通过Unsafe.park来阻塞线程
parkAndCheckInterrupt())
interrupted = true;
}
} finally {
if (failed)
cancelAcquire(node);
}
}
- 线程释放锁,从前面可以知道,获取到锁的线程会设置为CLH队列的头部。这里如果tryRelease返回true,且head的waitStatus!=0。就会更新head的waitStatus为0(设回初始值)并且
唤醒线程head.next节点的线程。1
2
3
4
5
6
7
8
9
10public final boolean release(int arg) {
//判断是否可以释放锁。
if (tryRelease(arg)) {
Node h = head;
if (h != null && h.waitStatus != 0)
unparkSuccessor(h);
return true;
}
return false;
}
- 更新head的waitStatus为0并且唤醒线程head.next节点的线程。
1
2
3
4
5
6
7
8
9
10
11
12
13
14
15
16
17
18
19
20private void unparkSuccessor(Node node) {
int ws = node.waitStatus;
//waitStatus不是取消状态,就设置成0
if (ws < 0)
compareAndSetWaitStatus(node, ws, 0);
//获取下个waitStatus不为取消的Node
Node s = node.next;
if (s == null || s.waitStatus > 0) {
s = null;
for (Node t = tail; t != null && t != node; t = t.prev)
if (t.waitStatus <= 0)
s = t;
}
//LockSupport.unpark是调用了Unsafe.unpark,唤醒线程。
if (s != null)
LockSupport.unpark(s.thread);
}