扩展接口
bean的生命周期过程的接口
Spring为容器内的bean生命周期提供了大量的扩展接口。可以实现这些接口,在Spring bean生命周期过程中对bean实例进行扩展。。
ApplicationContext中bean的生命周期
Spring中一个bean被创建过程的执行流程。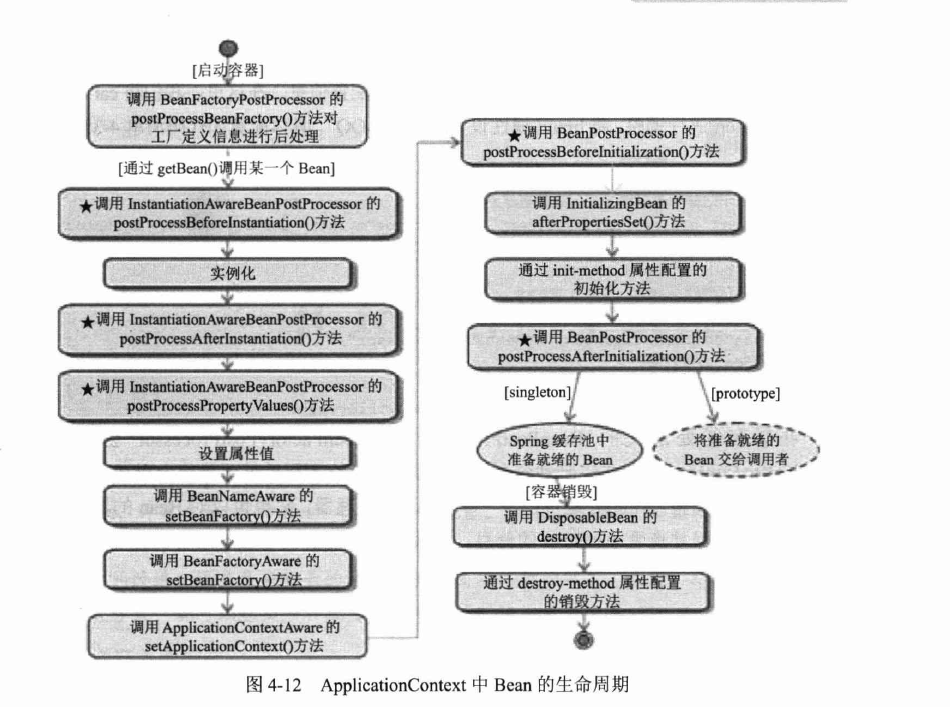
BeanFactoryPostProcessor
Spring IoC容器允许BeanFactoryPostProcessor在容器实例化任何bean之前读取bean的定义(配置元数据),并可以修改它。同时可以定义多个BeanFactoryPostProcessor,通过设置’order’属性来确定各个BeanFactoryPostProcessor执行顺序。1
void postProcessBeanFactory(ConfigurableListableBeanFactory var1) throws BeansException;
在Spring中内置了一些BeanFactoryPostProcessor实现类:
org.springframework.beans.factory.config.PropertyPlaceholderConfigurer : 读取配置文件,在bean初始化之前,根据注解或xml配置给bean设置值。
org.springframework.beans.factory.config.PropertyOverrideConfigurer:似于PropertyPlaceholderConfigurer,PropertyOverrideConfigurer对于bean属性可以有缺省值或者根本没有值
org.springframework.beans.factory.config.CustomEditorConfigurer:注册自定义属性编辑器,用于给bean属性转化类型
InstantiationAwareBeanPostProcessor
InstantiationAwareBeanPostProcessor 继承至BeanPostProcessor,比起BeanPostProcessor。InstantiationAwareBeanPostProcessor多出以下4个方法。主要处理的是bean的实例化过程。1
2
3
4
5
6
7
8
9
10
11
12
13
14
15
16
17
18
19
20
21
22
23
24
25
26
27
28
29
30
31
32
33
34
35
36
37
38
39
40
41
42
43
44
45
46
47
48
49
50
51
52
53/**
* 在bean实例化前执行(构造函数执行前)
* @param beanClass 被实例化bean的class
* @param beanName bean的名字
* @return 返回null就会执行默认的实例化过程,返回Object会替代默认的实例化bean。
* @throws BeansException
*/
default Object postProcessBeforeInstantiation(Class<?> beanClass, String beanName) throws BeansException {
return null;
}
/**
* 在bean实例化后执行
* @param bean bean被创建的实例对象,实例(依赖Spring注入的属性)属性值还没赋值。
* @param beanName bean
* @return 如果返回true,执行下面的属性值注入。返回false,属性设置行为会被跳过。
* @throws BeansException
*/
default boolean postProcessAfterInstantiation(Object bean, String beanName) throws BeansException {
return true;
}
/**
* 用于给bean处理值注入,@Autowire就在这个过程处理注入
* @param pvs Spring工厂中存在的属性值
* @param bean bean的实例对象
* @param beanName bean的名字
* @return 返回实例真实设置的值,返回null,继承当前pvs,继续执行后续的postProcessProperties处理值。
* @throws BeansException
*/
default PropertyValues postProcessProperties(PropertyValues pvs, Object bean, String beanName) throws BeansException {
return null;
}
/**
* Spring5已经过期,用postProcessProperties代替。
* @param pvs
* @param pds
* @param bean
* @param beanName
* @return
* @throws BeansException
*/
default PropertyValues postProcessPropertyValues(PropertyValues pvs, PropertyDescriptor[] pds, Object bean, String beanName) throws BeansException {
return pvs;
} /**
* 实例化对象前
*
*/
BeanPostProcessor
BeanPostProcessor有2个方法,扩展bean初始化流程(实例化早于初始化,初始化是为对象赋值,注入属性之类的)。1
2
3
4
5
6
7
8
9
10
11
12
13
14
15
16
17
18
19
20
21
22 /**
* 在类初始化前被调用
* @param bean bean的实例对象
* @param beanName bean的名字
* @return 返回bean的实例对象,如果返回null,后续的BeanPostProcessors 将不会被调用。
*/
default Object postProcessBeforeInitialization(Object bean, String beanName) throws BeansException {
return bean;
}
/**
* bean初始化之后
* @param bean bean的实例对象
* @param beanName bean的名字
* @return 返回bean的实例对象,如果返回null,后续的BeanPostProcessors 将不会被调用。
* @throws org.springframework.beans.BeansException in case of errors
*/
default Object postProcessAfterInitialization(Object bean, String beanName) throws BeansException {
return bean;
}
InitializingBean
实现该接口的bean的所有属性都被设置后执行。1
2
3
4 /**
* bean的所有属性都被设置完成时执行
*/
void afterPropertiesSet() throws Exception;
DisposableBean
实现该接口的bean的销毁时执行,用于释放资源1
2
void destroy() throws Exception;
FactoryBean
某些bean的实例化过程比较复杂,如果通过配置方式进行可能需要进行非常繁琐的配置。FactoryBean的作用就是用来实现这些bean的实例化。实现FactoryBean接口的bean,不能正常的通过Spring容器使用,通过Spring容器获取的总是它的getObject方法创建的实例。
1 | /** |